Scrivener lets you add front matter and back matter to your projects when you compile them.
How to Use Front and Back Matter when You Compile Your Scrivener Projects
When a book is published, in addition to the text and/or images it contains, there is also front matter and back matter. Front matter includes such things as a title page, the author's name, copyright information, and may include a table of contents, a dedication, acknowledgments, and a forward, preface, or introduction.
Back matter varies a lot according to the type of book. In some cases, there is no back matter, or simply information about the author. In others, there is an afterword, an appendix, notes, an index, a glossary, bibliography, and more.
Both of these are essential if you are self-publishing a book, and Scrivener allows you to integrate this information easily when you compile your project.
In this article, I'll look at front and back matter, and how Scrivener handles them when you compile a project.
Setting up Front Matter and Back Matter folders in the Binder
A good way to get started with front and back matter is to create a new project using the Novel template. Choose File > New Project, click Fiction in the Project Templates window, click Novel, then click Choose. This template includes a Front Matter folder. Note the location of this folder; it's not in the Manuscript folder, but rather on its own, below Characters and Places. It’s best not to have the Front Matter or Back Matter folders in the Manuscript folder, because they are treated specially when you compile. Also, you don't want these in the Manuscript folder for other reasons; for example, anything in the top-level folder gets counted in your statistics, but content in other folders is excluded.
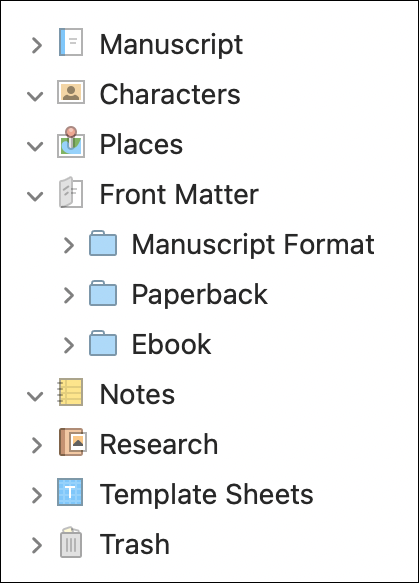
In this example, I've only got the Front Matter folder, but I could also set up a Back Matter folder. Just right-click the Front Matter folder and choose Duplicate, then rename it to Back Matter.
The example Front Matter folder has three sub-folders, designed for different compile formats, but you may not need them all. However, if you are self publishing, you may want to have sub-folders that correspond to different formats or to different vendors, because each vendor might expect you to include different content. So you could have one folder for Amazon, another for Kobo, and another for Apple. And if you self-publish print-on-demand books, you'd have another folder for that version, which will likely contain different content.
The three sub-folders are: Manuscript format, Paperback, and Ebook. Manuscript format is what you use when you compile your project to send to an agent or editor; normally, you save a PDF for this. Paperback is what you use for a print-on-demand paperback. And Ebook is what you use when you compile for .mobi or .epub formats. If you expand these folders, you see that they contain sample documents that correspond to the content you're likely to want to use.
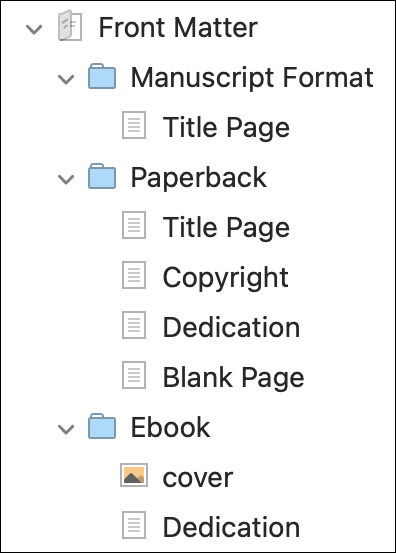
You can see that for Manuscript Format, all you have is a Title Page file; you could add others, such as if you want to include information about the author. For the Paperback format, you see several files that you may want to use, though not all books will need all of them. Note the Blank Page file; you can use this if needed so your text starts on a right-hand page, as is conventional. And in the Ebook format, you see a cover and dedication file. You may want to add others here: a title page after the cover, a copyright page (though with ebooks you may put this in back matter), an About the Author page, and more. You're free to add as many files as you want.
Compiling with Front and Back Matter
The key to compiling a Scrivener project is section layouts. In Using Section Layouts to Compile Your Scrivener Project, I explained how these work and how to assign them. Front Matter and Back Matter are treated specially when you compile. If you choose File > Compile, and select an ebook format in the Compile For menu, you'll see something like this:
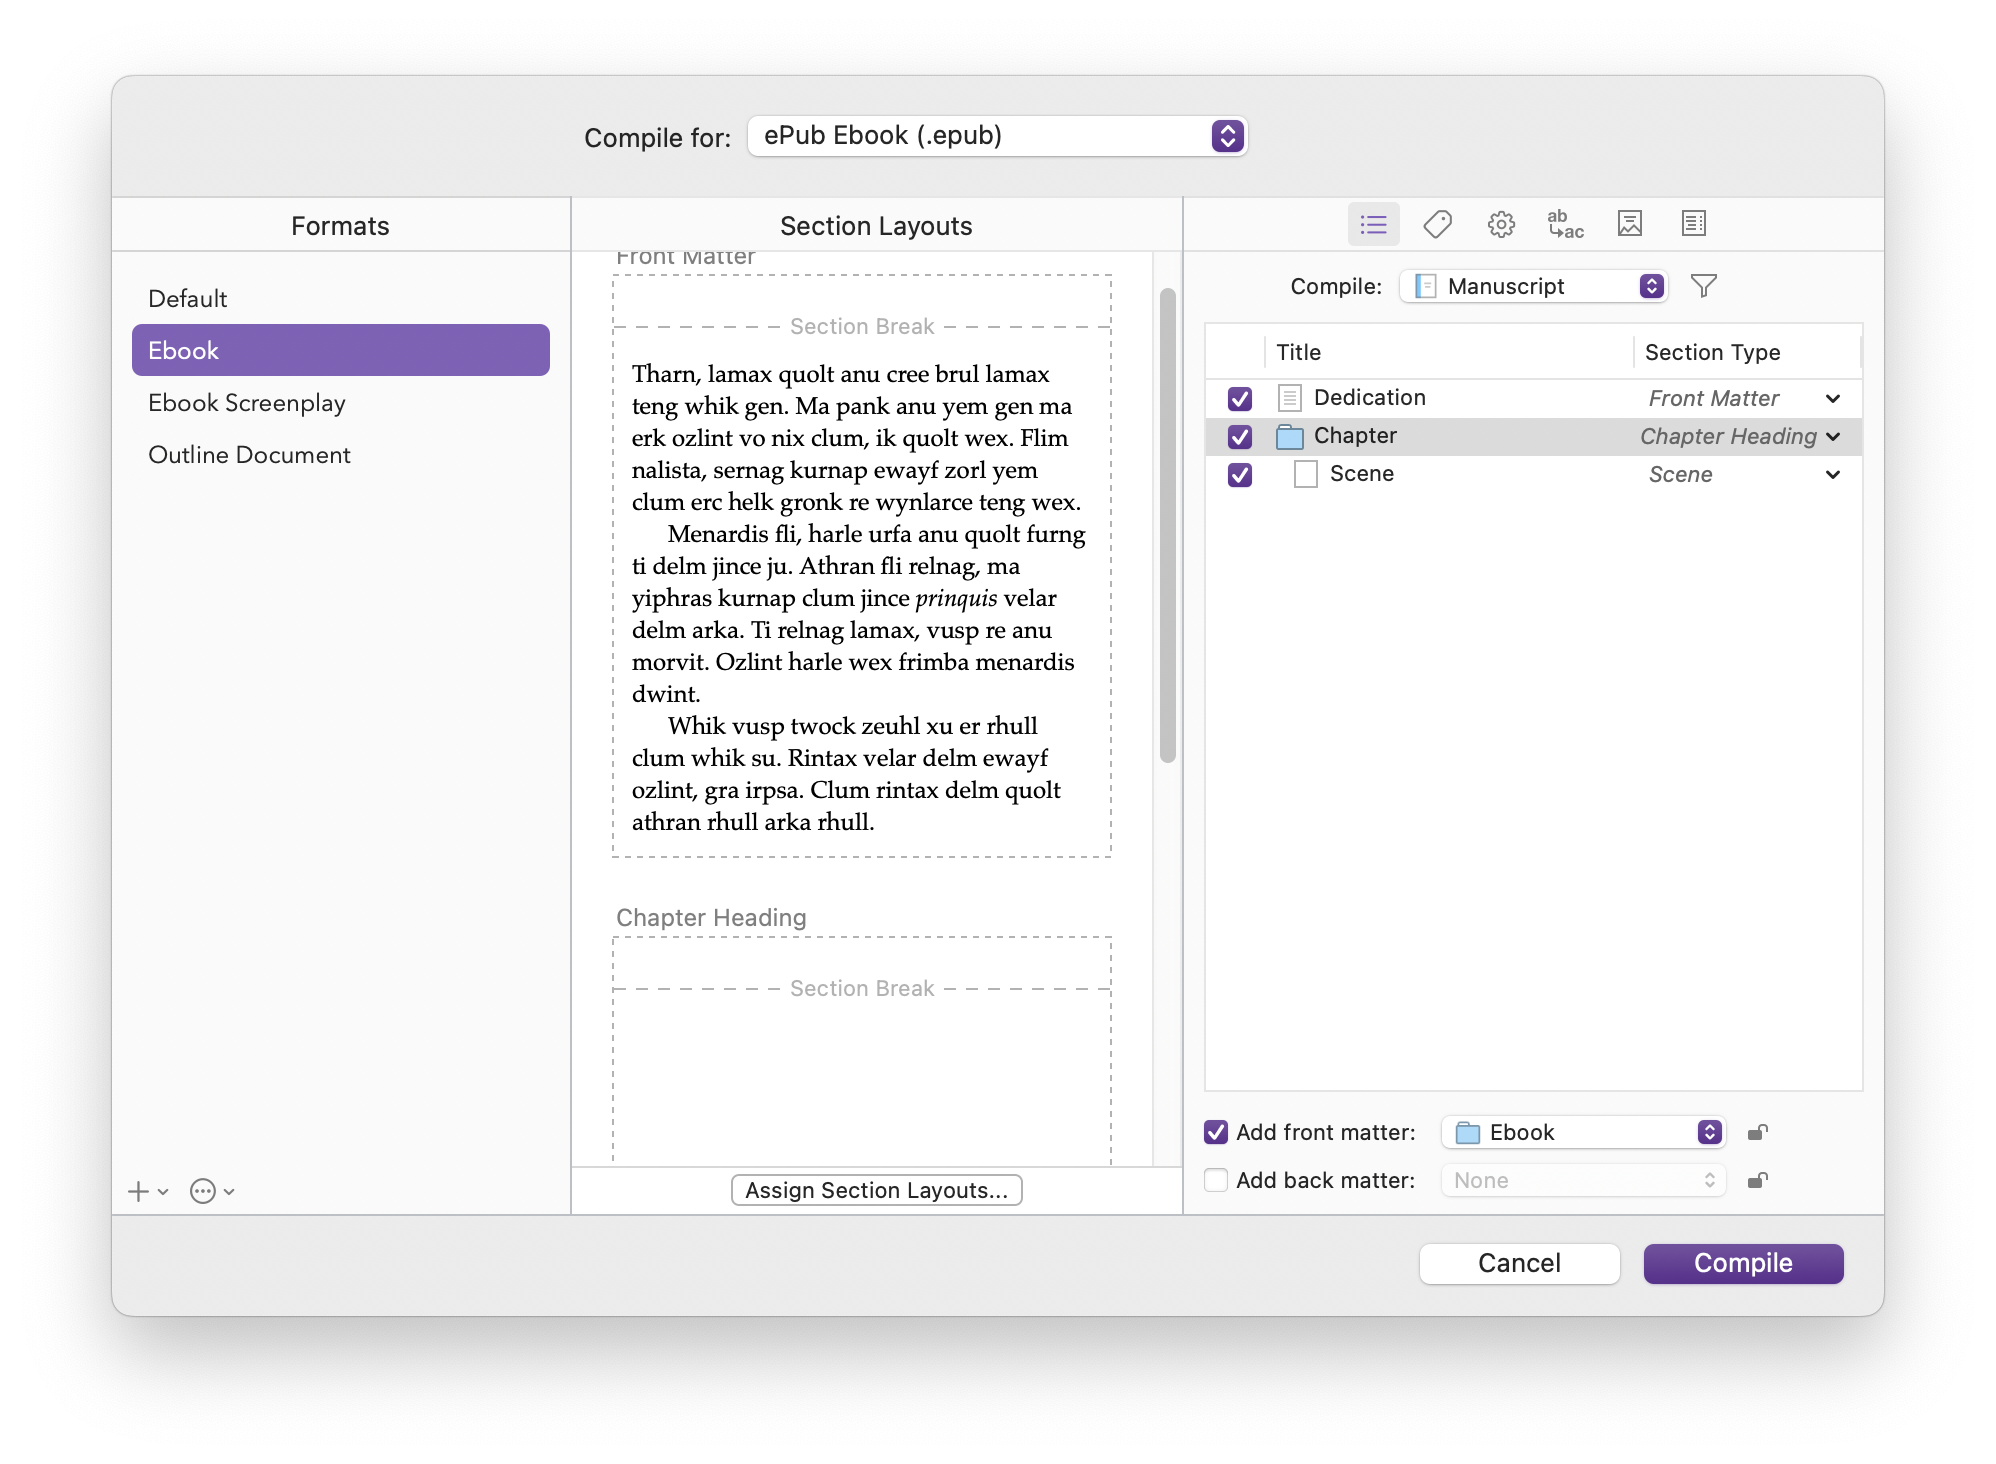
You can see at the bottom right that there are options to Add front matter and Add back matter. In the example above, I've enabled the former, and I've selected the Ebook sub-folder from the Front Matter folder. This only contains a Dedication page, but it could contain any of the front matter types mentioned above. When this is selected, Scrivener automatically applies the Front Matter section type to that content. If I had a Back Matter folder in my project, I could enable that and select the appropriate sub-folder.
As I said above, you may have different front and back matter according to the vendor of your ebook. If you want to compile your project for three different vendors, set up three sub-folders in the Front Matter folder - or in the Front Matter > Ebook folder - and compile your project three times, selecting the appropriate front matter folder each time you compile. Nothing will change in the text of your book; only the front matter will be different.
One useful feature is locking a specific front or back matter folder to a file type. For example, if you need to have different front matter for .mobi files and .epub files, create two sub-folders in the Front Matter folder, and select Compile for ePub Ebook. Select the appropriate folder at the bottom right of the Compile pane, then click the padlock. Do the same for the .mobi version. Now, each time you compile - and you may compile several times, after proofreading - you won't have to manually switch front matter folders; Scrivener remembers your choices.
When you compile your project, you can also include a cover. You saw above that there was a cover graphic in the Ebook folder of the Front Matter folder. When you compile for PDF, .epub, or .mobi, Scrivener can add the cover image it finds in the front matter folder you have selected.
Click the Cover icon in the toolbar of the Compile dialog (indicated by the red arrow). By default, Scrivener uses the first image in the selected Front Matter folder. So if your cover image is there, you don't need to do anything else.
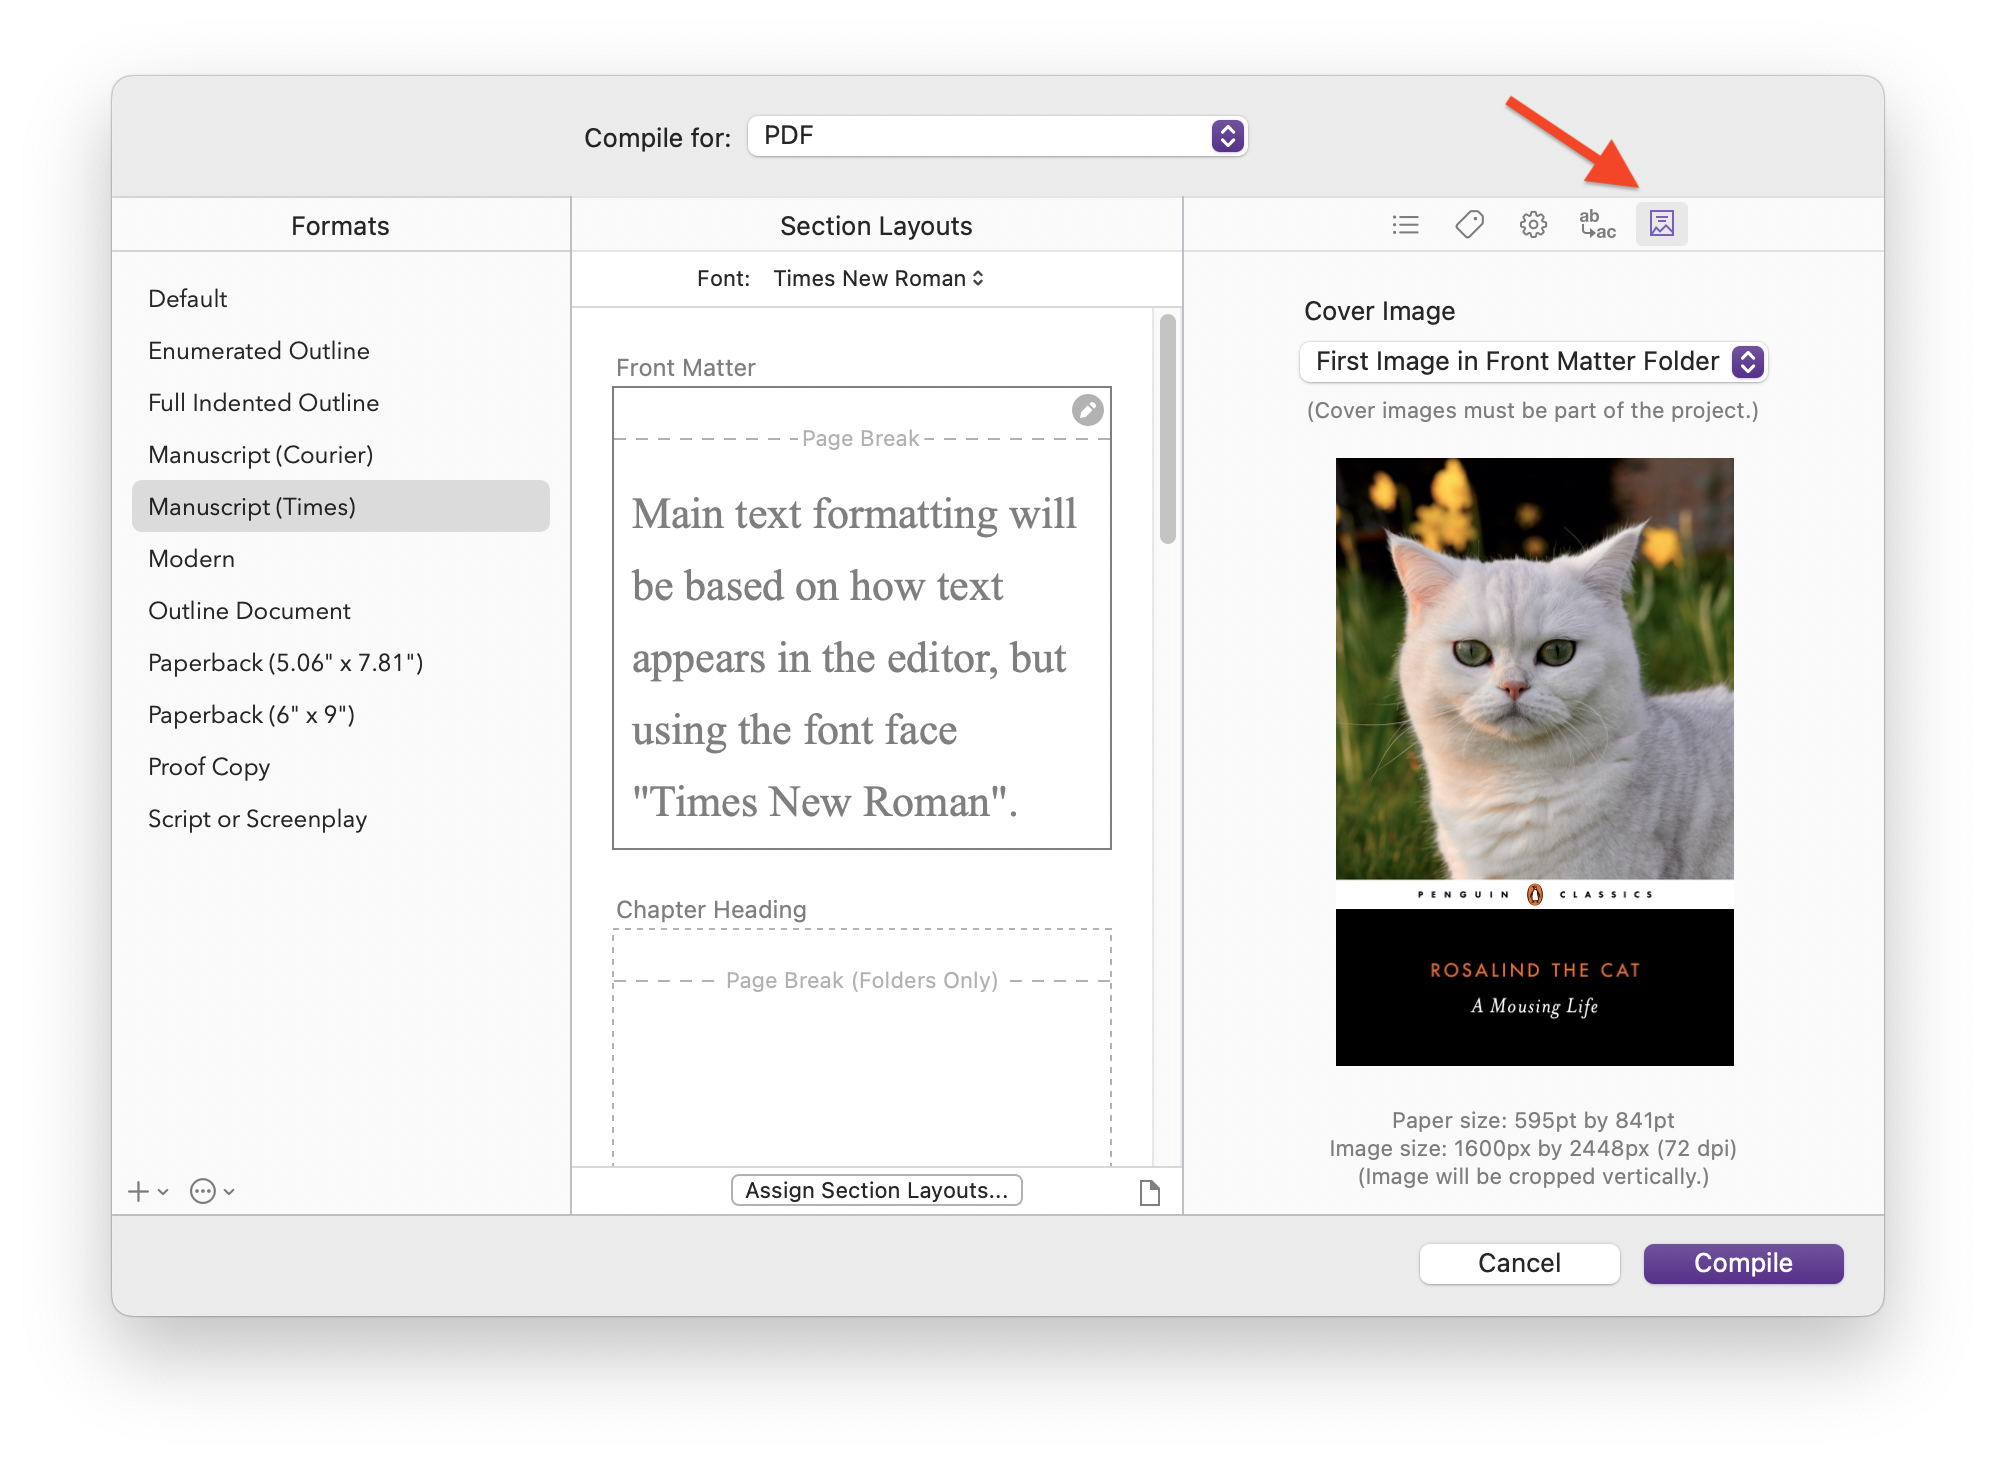
If you want to use a different image, click the popup menu and select it (it must be somewhere in your project); or choose No Cover Image if you don't want to use any.
As with all of Scrivener's compile features, there are many settings; section 23.4.1 of the Scrivener manual goes into detail about front and back matter.
Kirk McElhearn is a writer, podcaster, and photographer. He is the author of Take Control of Scrivener, and host of the podcast Write Now with Scrivener.